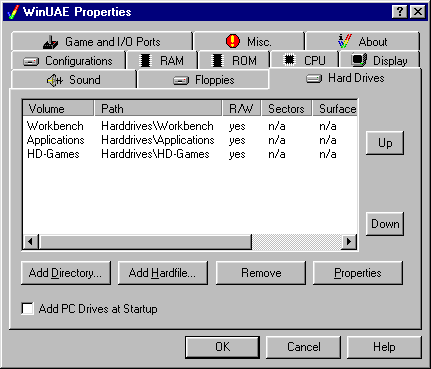
This tab contains some very important options, because you can configure harddisks for your "Amiga".
Since using diskfiles is awkward, it is necessary to emulate harddisks. There are two ways how you can use large amounts of data with UAE: harddisk files and mounted directories.
Add Directory... adds a virtual HDD to your Amiga. You can specify a path to your desired folder in Windows and a special name, which will be used for the HDD in the emulation.
This has some major advantages:
You can also use native filesystems to mount Amiga CD-ROMs, and you can abuse the hardfile emulation to mount floppy disks.
Add Hardfile...
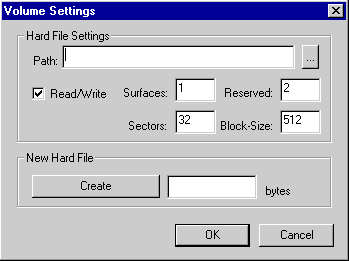
With this dialog you can add an hardfile. If you want to use an existing file, just click this button ... and select to file. If you want to add a new file, specify the number of bytes you want it to be. For example: 1MB = 1024kB = 1048576 bytes.
Harddisk files are large files that contain the image of an Amiga filesystem. They work much the same way as a disk file. You can simply create a large empty file and tell UAE to use it as a hardfile, but you will need to format it from the emulation before you can actually use it.
If you are using Kickstart 1.3 or earlier, hardfiles can't currently be mounted at boot time, and therefore you can't boot from it either. You will have to boot either from a Floppy Disk Image or from a Filesystem, and mount the hardfile.device later. To do this, add the following to "DEVS:mountlist":
UAE0:
Device = uaehf.device
Unit = 0
Flags = 0
Surfaces = 1
BlocksPerTrack = 32
Reserved = 1
Interleave = 0
LowCyl = 0 ; HighCyl = 511
Buffers = 5
DosType = 0x444F5300
BufMemType = 1
You may need to adjust the values if you specified a different geometry, and/or your hardfile has a different size than 8MB, and/or the hardfile is not mounted as DH0: because you mounted other harddisks before it. Then, type "mount DH0:" (or put that command in your startup-sequence), and you should be able to access it. Don't forget to format it with the AmigaOS !
Remove removes a harddisk from the configuration. Simply select a harddisk and click "Remove".
Properties allows you to change the settings for your virtual HDD. To adjust, click your desired HDD and select properties.
Add PC Drives at Startup mounts all available PC drive-letters for the Amiga to use, using the following naming convention:
| Hard Drives | WinDH_x: |
| CD-ROM Drives | WinCD_x: |
| Floppy Drives | WinDF_x: |
| Network Drives | WinNW_x: |
| Removable Drives | WinRMV_x: |
| RAM Disk Drives | WinRAM_x: |
NOTE: If a drive doesn't currently have a disc in it (floppy, CD-ROM, etc.), then this option will NOT mount the drive for use by the Amiga.